
Someone was talking about listing and having to make more and more appliers for heads/tails/accesories for their mods and this got me thinking about some of my friends who keep having to made a lot of rework and appliers for A-B-C-D because each thing is different or how I recently received a custom mod that included and applier and it made me feel bad because they could have simply made it BOM and voila!
So this is going to be a post about HOW to edit your products to be BOM and hopefully this will help more than one user.
NOTE: Please know that you will need to have a medium knowledge of how to edit things in order to do this. If you are not able to follow it, that is also okay and you can skip this whole tutorial and go to the end for a work around.
WHAT IS BOM? A short introduction:
BOM or Baked on Mesh is a new updated technology in Second Life introduced on August 26th, 2019. Baked on Mesh (BOM) allows you to use system textures (typical SL clothes/skin/makeup layers) to use them on items like mesh bodies, heads and more.
With BOM, you can apply any of these layers to your avatar without the use of an Alpha Layer, and then tell the viewer to apply the resulting baked texture to your selected object/head/accessories.
For more detailed information you can read the Second Life Community post HERE.
HOW DO I USE BOM FOR A PRODUCT?
Some content creators have been turning into doing BOM only skins and more. When you buy a product they will usually include a notecard with information on how to use their product, they will indicate what each layer included is and how it should be worn.
Prepare/Test on your objects/parts
So now that you have bought your BOM product, you need to go and edit the objects so they are able to read the appropriate channels, meaning you need to make your objects BOM as well.
For this example I will be using the HP Deer Head. Wear your item and go into edit mode:
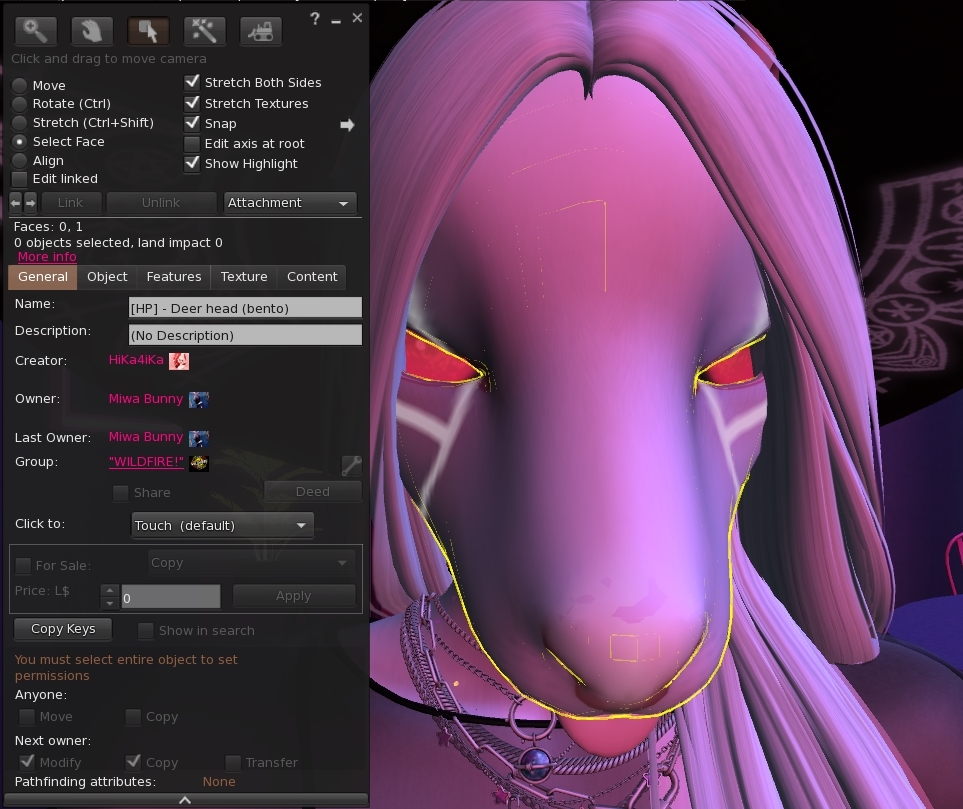
- Right-click on the head.
- Click on EDIT.
- Click on SELECT FACE.
- While holding SHIFT, click the faces that need to be edited.
In this case is both sides of the HP Deer Head.
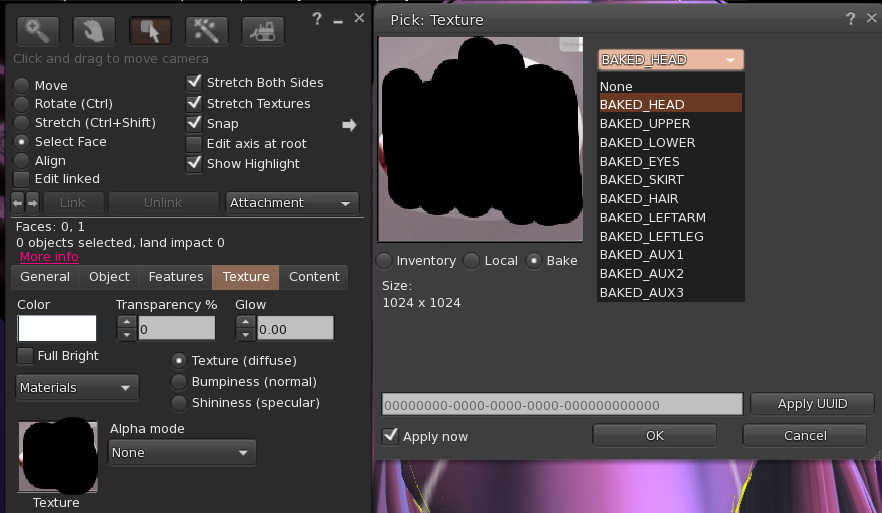
- Go to the TEXTURES Tab.
- Click on the big SQUARE.
- Then click on BAKE.
- And select the layer to be read from the list.
Since this is for a head, you need to choose BAKED_HEAD.
Each content creator changes where they place the other parts, this is why it is super important that you READ THE NOTECARD THEY ADD TO THE PRODUCT.
Once you have done this, wear the layers as indicated by the creator so the system (aka Second Life) can read the information and apply the textures to the parts necessary.
I hope this tutorial has been helpful to your Second Life experience and now go forth and buy from the many different content creators out there. Here is a list of a few who are sponsors or have sponsored my content in the past.
{ anxious angel } | A E T H E R | stellarium | Wicked Pup
I have also made a tutorial for content creators, which I am hopeful you will find easy and simple to follow. You can find it here:
BOM: A MIWA BUNNY HOW TO GUIDE FOR CONTENT CREATORS.
If you do not wish to go through the process above read below:
There is a series of HUDs made available, most of them, for free by a store called {Kitty} that will help you easily fix these. You can find the full HUD listing HERE.
Special thanks to Jay from Wicked Pup for pointing this product out.
Update July 5th, 2021
